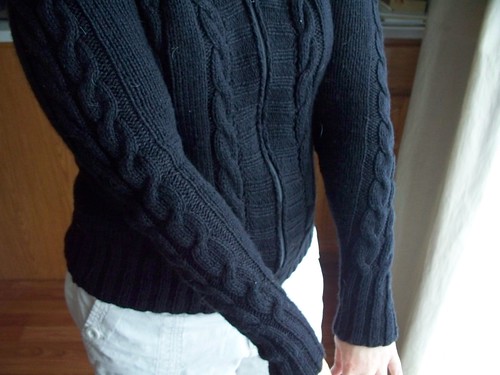
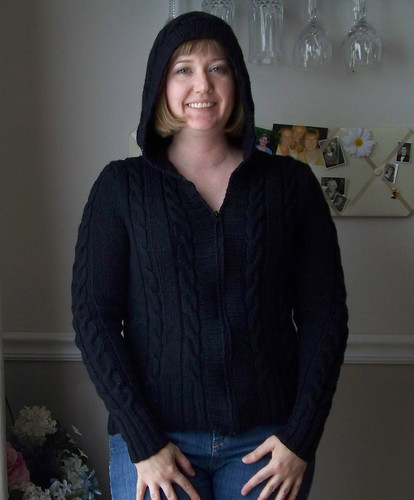
Pattern: Central Park Hoodie (from Knitscene, Fall 2006)
Yarn: Plymouth Yarn Royal Silk Merino in Black (12 skeins)
Needles: size US 6 and 8
Size made: 36
I started this way back in February, and got side-tracked on other things before I could finish it. Now with WIPs Wrestlemania I've gotten motivated to finish it!
I wasn't really planning on doing it in black, but I got the yarn on sale. It was fate - I love the black! (Even though it shows my white kitty cat's fur awfully!) It was a tad difficult to see what I was doing at times - but the extra trouble was worth it in the end, I think!
I made several modifications. I worked the body about 1/2 inch longer than the pattern called for. Also, I knit the arms about 1 inch longer than the pattern called for.
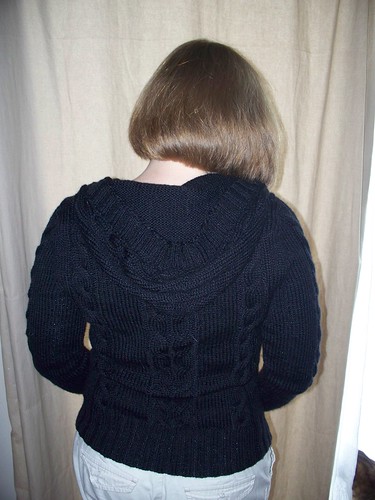
My hood is modified quite a bit from the pattern. I really hate the pointy top you get in hoods when they're constructed straight up and seamed at the top. I was inspired by TurtleGirl's CPH, and wanted to incorporate short rows and a bit more room in the hood. I didn't want mine to be quite as blousy and cape-like as hers, though. I was going for a more fitted look, since the body of my cardigan is quite fitted.
Here's a detailed description of what I did for the hood:
- I worked the hood straight for 4 inches, then used stitch markers to mark the center 18 stitches.
- I then worked paired increases on each side of these 18 stitches about every inch. I worked the hood in this way for 11 total inches. (I ended up with 88 stitches on the needle.)
- Then I knit to 5 sts before the center, and started working short rows. (w&t and purl back). Then I did 7 more evenly spaced short rows on the right side.
- Once those were done, I knit all the way back to the left side (knitting the wraps together with the wrapped stitches as I went) and worked the same number of short rows for the left side - purling till 5 sts from the center and w&t. etc, etc. Working 8 total short rows on the left. I purled all the way back to the right (purling the wraps together with the wrapped stitches as I went) and then knit 1 row in pattern before grafting (in pattern) the top of the hood together.
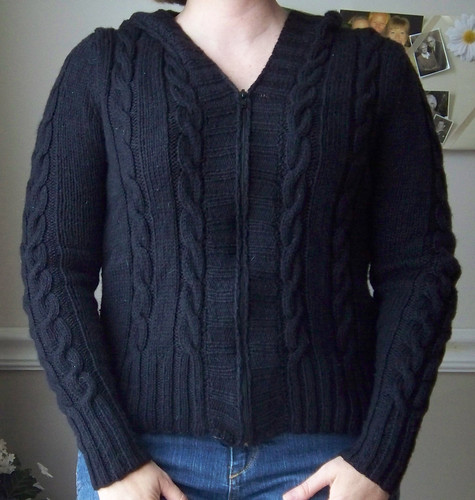
I picked up my buttonband stitches along the entire front, instead of picking them up on each side, as indicated in the directions. I knit my buttonband for 2 inches, and then sewed in an 18 inch separating zipper instead of using buttons. (I didn't want to get the buttonband 'gap' that fitted knit sweaters can get - which ruins the look!!)
Overall, I am very happy with it, and I can't wait to wear it when the weather turns cooler! The yarn is a yummy 50/50 Merino/Silk blend, which feels just scrumptious against the skin. I'm a tad bit upset with my zipper job, since it's a bit wavy, but I can live with it. (Well, and if I can't then I'll rip it out and do it over again! Now that I'm thinking about it, I may do that tomorrow. ;-) )
My Purl friend (and former New Yorker) Donna says it's a very 'New York' sweater, especially in the black! I've yet to visit New York (hopefully I will someday!), but it certainly seems that way to me too.
One more WIP down by the Ivory Ninja! 10 more to go, and only 12 more days to do it in! Yikes!